
Tis the season! Time to cozy up in the kitchen and to adorn your counter tops with sweet treats for cheeky little fingers to come grab for an afternoon snack. Not an expert baker? Me neither! These recipes arranged in order of simplicity but trust me, if I can do it, you can too — just depends on how ambitious you’re feeling.
A few notes before we begin: please do not worry if you don’t have a standing mixer, a handheld electric one will do!! I JUST got mine but was practicing my baking skills long before that and while it is a luxury, please do not let it hold you back. I know that one can feel excluded once the recipe calls for the standing mixer but I am here to tell you to carry on!
I have learned a FEW tricks along the way as I practice my baking skills and I would like to share with you to further demystify the process and to make sure you hit less roadblocks along the way.
First, when you’re measuring out ingredients, particularly flour, don’t pour the flour from the bag directly into the measuring cup. Rather, use a smaller spoon to scoop the flour from the bag into the measuring cup. The result is a fluffier amount of flour with more air between particles vs packing it down and making it dense. You want it to be light and loose, not compact. I do this with sugar too, and basically every ingredient unless it specifically says “packed” brown sugar, in which case I will press down a bit to add some more.
Next, there’s nothing more crushing than investing effort in baking, patiently waiting while the tantalizing aromas drift from the oven only to have your masterpiece stick to the pan! It’s happened to me before with banana bread even after I became familiar with the recipe and it was really annoying! Delicious though it was, it loses visual appeal after it cools and becomes a lost cause. And let’s face it, the first taste is with the eyes. So, the best way to combat this that I have found is to familiarize with the butter, flour, parchment, butter, flour technique. Overkill though it may be, I’d rather be safe than sorry.
Take your pan or baking dish and coat it in room temperature butter. Honestly I have found the best way to spread it around is to use my (clean) fingers. Add a light dusting of flour to said butter and shake our excess. Then, line the baking dish with a layer of parchment (if it’s a deeper dish like for the bars below, I leave an overhang of 2 inches on each side so that I can gently lift the finished product out). I then lightly butter and flour the parchment again and the pan is ready. Now, i’m sure this isn’t necessary for every recipe but I do find that in the instance of the below bars, the excess butter adds a crispy caramelized layer to the bottom of the crust so no harm, no foul.
Last, a lot of recipes are going to call for room temperature ingredients — particularly butter and eggs — and so do try to take those out even a few hours before you begin as it just makes for a seamless experience. I am always starting a recipe, reading it through as I go along and finding out I missed a step so this might just apply to me.
Last, baking pretty much always calls for unsalted butter, so stock up. You can freeze it!
Anyway, I am not a pro, so pros avert your eyes or share your feedback, but I have found myself capable of making these recipes more than once so here we go!

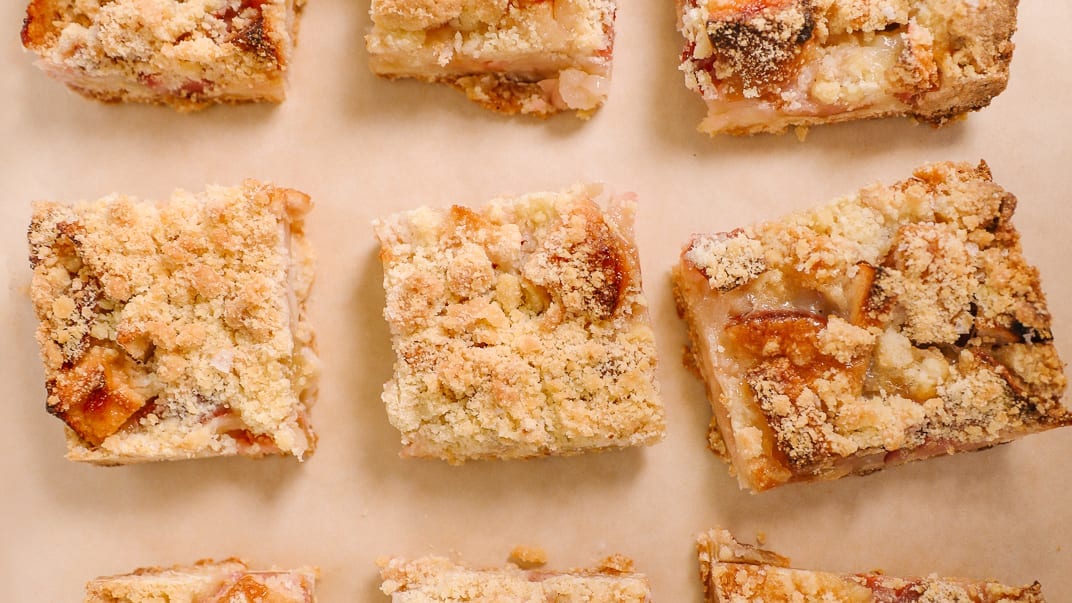
APPLE CRUMBLE BARS
First up, the simplest fruit crumble bars from the Newlywed Kitchen — you can make these with any seasonal fruit, so here I have selected local apples. I have royally messed this one up before and it was STILL delicious.
For crust:
1/2 cup (1 stick) & 5 tbs butter unsalted, room temperature plus more for pan — be liberal.
1 cup cane sugar
2 cups all purpose flour
1 teaspoon course salt
For filling:
3-4 apples cored and chopped
1/2 cup sugar
2 tablespoons flour
1 tablespoon (or 1/4th a wedge) lemon juice
1/2 teaspoon course salt
- Preheat the oven to 375. Butter an 8×8 by 2 inch baking pan. Line with parchment (I also re-butter the parchment), leaving an overhang on each side.
- Make filling: stir together diced apples (I keep skin on but core), sugar, flour lemon juice and salt.
- Make crust: Mix together dry ingredients — flour, salt in medium bowl.
- Beat butter and sugar with an electric mixer (hand held or standing) until light and fluffy, about 3 minutes. Scrape down the bowl as you go. Add flour and salt and mix just until the dough forms clumps (I pulse) but does not completely hold together — it’s like clumpy sand.
- Press 2/3 of the dough into the pan, it’s about an inch thick and save the rest.
- Pour filling into the crust, spread evenly. Crumble and clump the remaining crust mixture on top.
- Put in the oven until golden, about an hour and ten minutes (if browning too quickly you can put tin foil on). LET IT COOL IN THE PAN, about an hour. Refrigerate, wrapped tightly in plastic or in an airtight container until ready to serve. Cut into squares. It’s seriously a crowd pleaser. You can re-heat and serve with ice cream but they’re AWESOME right out of the fridge.
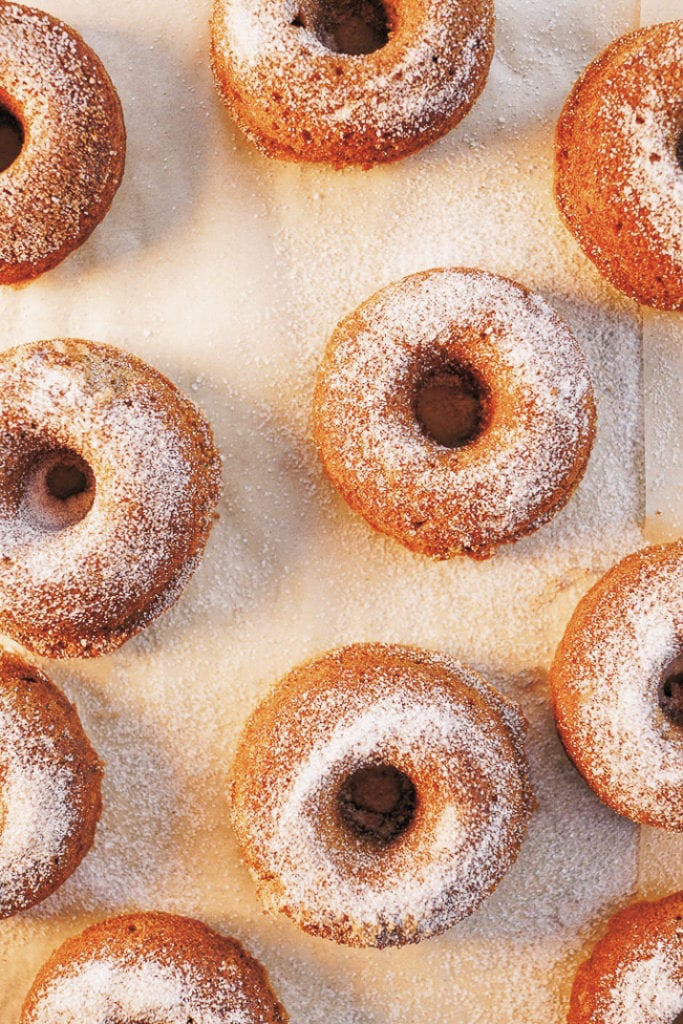
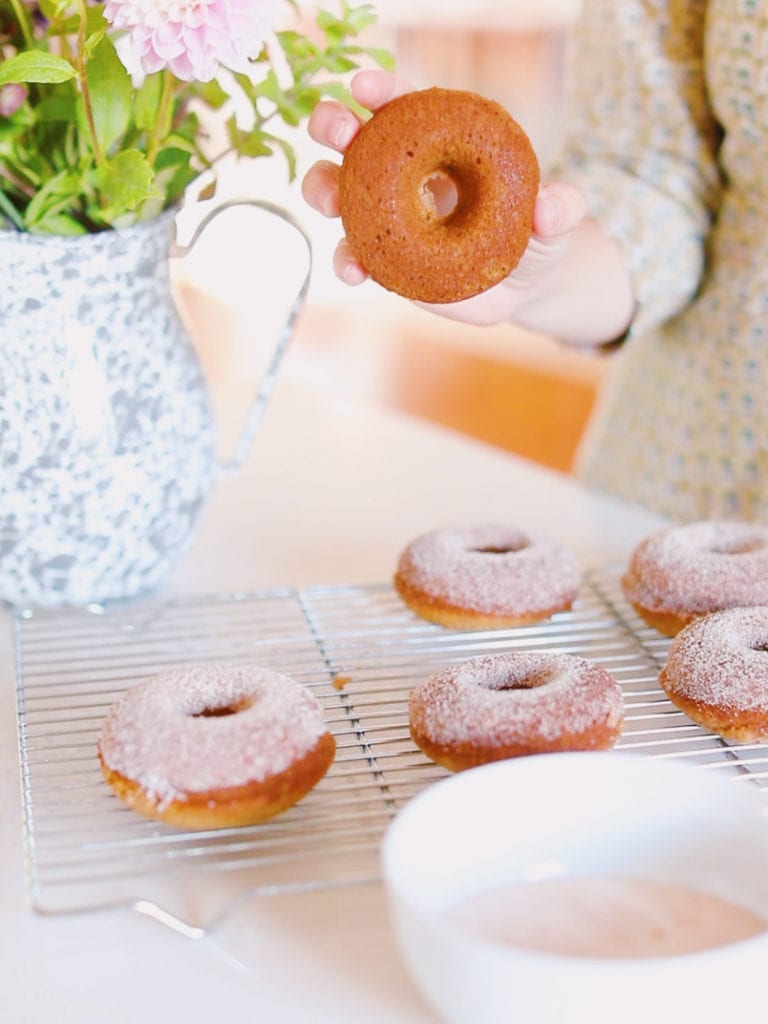
APPLE CIDER DONUTS
I made these on stories recently but wanted to publish the recipe here. It is adapted from the NYTimes — I made it accidentally one way and then followed the recipe perfectly the next time and found the first was better so I tested it twice more the accidental way and still agree that’s better so here we are!!
These are so good, they are so easy! The donut pan is the magic trick here which is why it’s number two in the “easiness” line. Really fun to make and they’re best warm with a cup of tea but can be enjoyed for a few days if you don’t mind cakey donuts. I love them.
Ingredients:
1 3/4 cup of flour
1 1/4 teaspoon of baking powder
3/4 teaspoon fine sea salt
3 teaspoons of cinnamon (2 for donuts, 1 for sugar mixture)
1 teaspoon of nutmeg
1 cup of butter (2 sticks), unsalted, room temp
3/4 cup of light brown sugar
3/4 cup of granulated sugar (1/4 for donuts and rest for sugar mixture)
2 large eggs, room temp
1 teaspoon of vanilla extract
1/2 cup of apple cider
- Heat the oven to 350. Lightly grease 2 donut pans (or 1 donut and 1 muffin tray for excess) with nonstick spray.
- In a medium bowl, add flour, baking powder, 2 teaspoons of cinnamon, 1 nutmeg and whisk to combine. Set aside.
- In the bowl of a standing mixer (or with a handheld electric mixer), cream the butter, all the brown sugar and ONLY 1/4 a cup of the white sugar on medium speed until fluffy — 3 or 4 minutes. Add the eggs one at a time and make sure that they are well incorporated after each is added, scrape down sides of the bowl. Add vanilla and quick mix!
- Add flour mixture until incorporated but not over mixed.
- Add in the apple cider slowly and steadily until the mixture is homogeneous…. try not to overmix.
- Spoon the batter into the donut pans/muffin tray filling them about 2/3 the way full (they rise). It’s sticky and hard to spread and doesn’t look so glam going in but they rise….
- Set the timer for six minutes and rotate the pan in the oven, cook for six more minutes or until golden — about 12-15 minutes.
- Meanwhile, prepare the sugar cinnamon mix in a wide enough bowl to dip the donuts in.
- Once the donuts are finished, let them sit in their pan for five and then gently tip them onto a cooling rack.
- Twist them in the remaining sugar/cinnamon to frost.
- Enjoy!
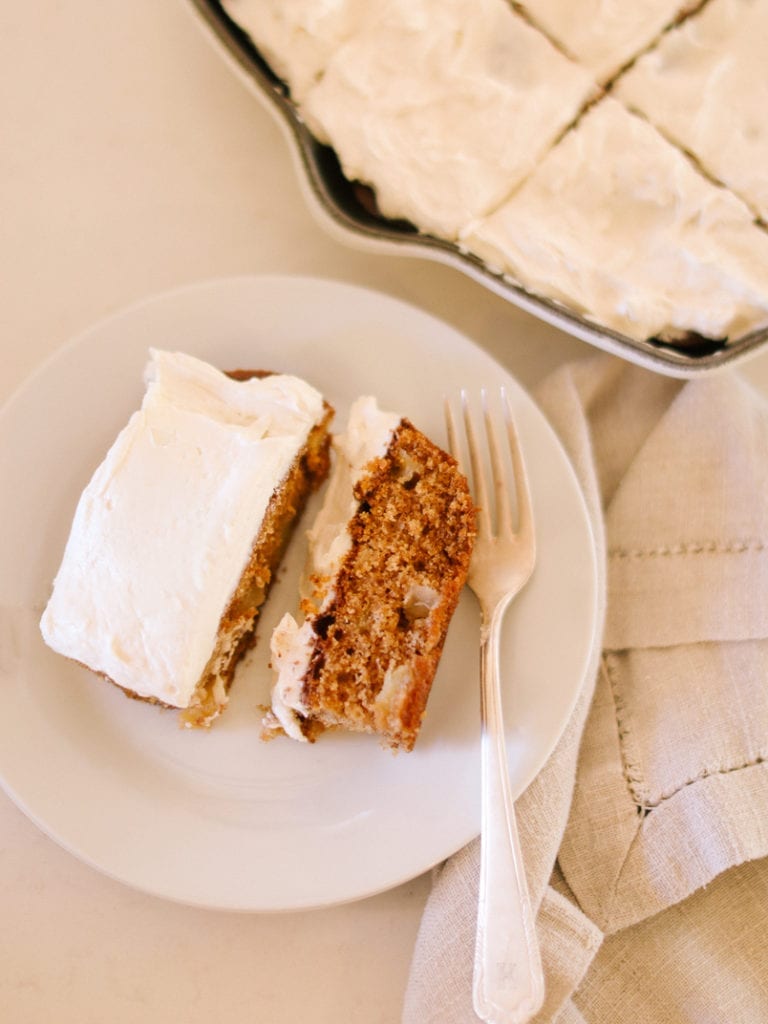
APPLE CARAMEL SKILLET CAKE
This is a bit more involved. It’s not hard, it’s just a few steps — cooking the apples, baking the cake, making the frosting. It’s good though! I also recommend using the candy technique as recommended vs trying to make your own caramel like I did :). This is taken from the NYTimes and adjusted to use local apples and a few tweaks. If you’re not subscribed, the NYTimes cooking app/website is my absolute FAVORITE. I really highly recommend.
Caramel Apples:
4 Tablespoons butter (unsalted)
2 large or 3 medium baking apples (Honeycrisp, Gala, Grannysmith, etc) peeled, cored, diced into 1/2 inch pieces
1/2 cup of dark brown sugar
1/4 teaspoon of fine sea salt
For the cake:
1/2 cup of unsalted butter (1 stick), at room temperature, plus more for the pan
1 1/3 cup of dark brown sugar
3 large eggs (room temp)
1 1/2 teaspoon vanilla extract
1 2/3 cup flour
3/4 teaspoon baking powder
1/2 teaspoon salt
1/2 teaspoon cinnnamon
1/4 teaspoon nutmeg
For the frosting:
3/4 cup of unslated butter (1.5 sticks)
3 cups of confectioners sugar, sifted
7 ounces of unwrapped soft caramel candies
2 tablespoons heavy cream
1 1/2 teaspoons vanilla extract
Flakey sea salt, as needed for finishing!
- Make apples — peel, core, chop. Melt butter in pan over medium heat, add the apples sugar and salt and cook, stirring occasionally until the sugar dissolves and the apples are softer — 4 minutes. Let it cool to room temperature.
2. Heat the oven to 350. Grease a 10 inch oven-proof skillet. You do not need to use the parchment technique here, just some heavy buttering of the pan!
3. Make the cake: use a paddle of an electric mixer to cream the butter and sugar until fluffy, (4-5 min) add the eggs one at a time, beat well after each addition, scrape down the sides as necessary, beat in the vanilla.
4. In a medium bowl, whisk together the dry ingredients for the cake: flour, baking power, salt, cinnamon, nutmeg. Add the flour mixture to the mixer and mix until just incorporated.
5. Gently fold the cooked apple mixture (including all the liquid from the pan) into the batter and mix until just incorporated. This is the fun bit because it becomes a fluffy, chunky liquid caramel dough!
6. Pour into the pan and cook until golden and it appears set (use the toothpick in the middle trick), a few moist crumbs in the center are ok — undercook vs. overcook!
7. Make the frosting — electric mixer with paddle, cream butter and sugar until fluffy. Microwave the caramels until they are warm and fluid and then add on a medium speed. Add the remaining ingredients.
8. Frost the cake, but wait until it has COMPLETELY cooled, otherwise the frosting sort of melts. Sprinkle with flakey sea salt and serve.